Tool: Learning Management System
This course website is the main source of information for the course. In addition, we use Canvas for some things (e.g., announcements, file submissions, grade book, ...).
Tool: GitHub (for code hosting)
You are required to use GitHub as the hosting and collaboration platform of your project (i.e., to hold the Code repository, Issue Tracker, etc.).
Preparation:
Create a GitHub account (if you don't have one yet), as explained in the panel below.
More info: See Appendix E - Using GitHub.
Tool: Git (for revision control)
You are required to use Git. The recommended GUI client for Git is Sourcetree, but you may use any other, or none.
Preparation:
1. Install Git and a Git GUI client on your computer.
- Option A [recommended]: install Sourcetree (our recommended Git GUI) which comes bundled with Git i.e., if you install Sourcetree, you get both Git and a GUI client in one shot (installation instructions).
- Option B: Install stand-alone Git: If you are already familiar with Git and you prefer to use Git via the command line (i.e., without a GUI), you can install standalone Git instead.
2. Set Git user.name: We use various tools to analyze your code. For us to be able to identify your commits, we encourage you to set your Git user.name in all computers you use to a sensible string that uniquely identifies you. For example, you can set it to your GitHub username or your full name. If this username is not set properly or if you use multiple usernames for Git, our grading scripts might miss some of your work.
After installing Git in a computer, you can set the Git username as follows:
- Open a terminal that can run Git commands (e.g., a Git Bash window, which comes with Sourcetree)
- Run the command
git config --global user.name YOUR_GITHUB_USERNAME
e.g.,git config --global user.name JohnDoe
More info about setting Git username is here.
Cautions about Git GUIs (especially if you are new to Git):
- Using Git GUIs other than Sourcetree is allowed, but we are unable to provide support if you run into any problems while using a different Git GUI.
- Using Git (or GitHub) features that come with the IDE is discouraged as it is better to learn Git/GitHub independent of any other tool.
- Using clients provided by GitHub (e.g., GitHub Desktop app) is discouraged as it will make it harder for you to separate Git features from GitHub features.
- Long-term use of a Git GUI for all Git usage is discouraged as well. Once you are over the initial learning curve, it is best to use CLI in tandem with GUI, as each mode has pros and cons. Often, the best is to perform operations using CLI and use a GUI to get a more visual view (e.g., to visually inspect the revision graph).
Tool: Coursemology (for coding exercises)
- We'll be using Coursemology for coding exercises (compulsory).
Preparation:
- You'll receive the invitation to Coursemology sometime close to the first lecture.
- More information about Coursemology will be given in the first lecture.
Tools: for communication
Forum (for discussions, asking admin questions, seeking help, etc.)
- The preferred channels for course-related communication is the
forumon GitHub https://github.com/nus-cs2113-AY2425S2/forum/issues (not the Canvas forum) - When communicating with instructors, use the forum. Use private channels (e.g., emails, private messages, face-to-face, private chat groups) only when the forum is not suitable. Rationale: 1. More classmates can benefit from the discussions, 2. It is also safer because the prof can monitor information you receive for accuracy.
- You are encouraged to help others in the forum (e.g., share tips, help with technical problems). We consider such sharing when giving out
A+grades and when recruiting tutors.
Preparation:
We encourage all to watch the forum to get alerts when new issues/comments are posted 
MS Teams (as a backup if Zoom chat fails, for practical exam)
- MS Teams is used in our tutorials.
Install MST in your computer. Installation and login instructions are here. Remember to login using your NUSNET account.
- MS Team for this class: CS2113-AY2425S2
Tool: IntelliJ IDE
IntelliJ IDEA is the recommended IDE for course-related programming work. Using an IDE is strongly recommended but is not compulsory.
Use other IDEs at your own risk, because,
a) course materials are optimized for IntelliJ, and,
b) we won't be able to help you if you run into problems while using any other IDE.
Preparation:
- Install the IDE in your computer. You may use the IntelliJ community edition (free) or the ultimate edition (free for students).
- If you have an older version of the IDE, we recommend updating to the latest version.
Tool: RepoSense (for authorship tracking)

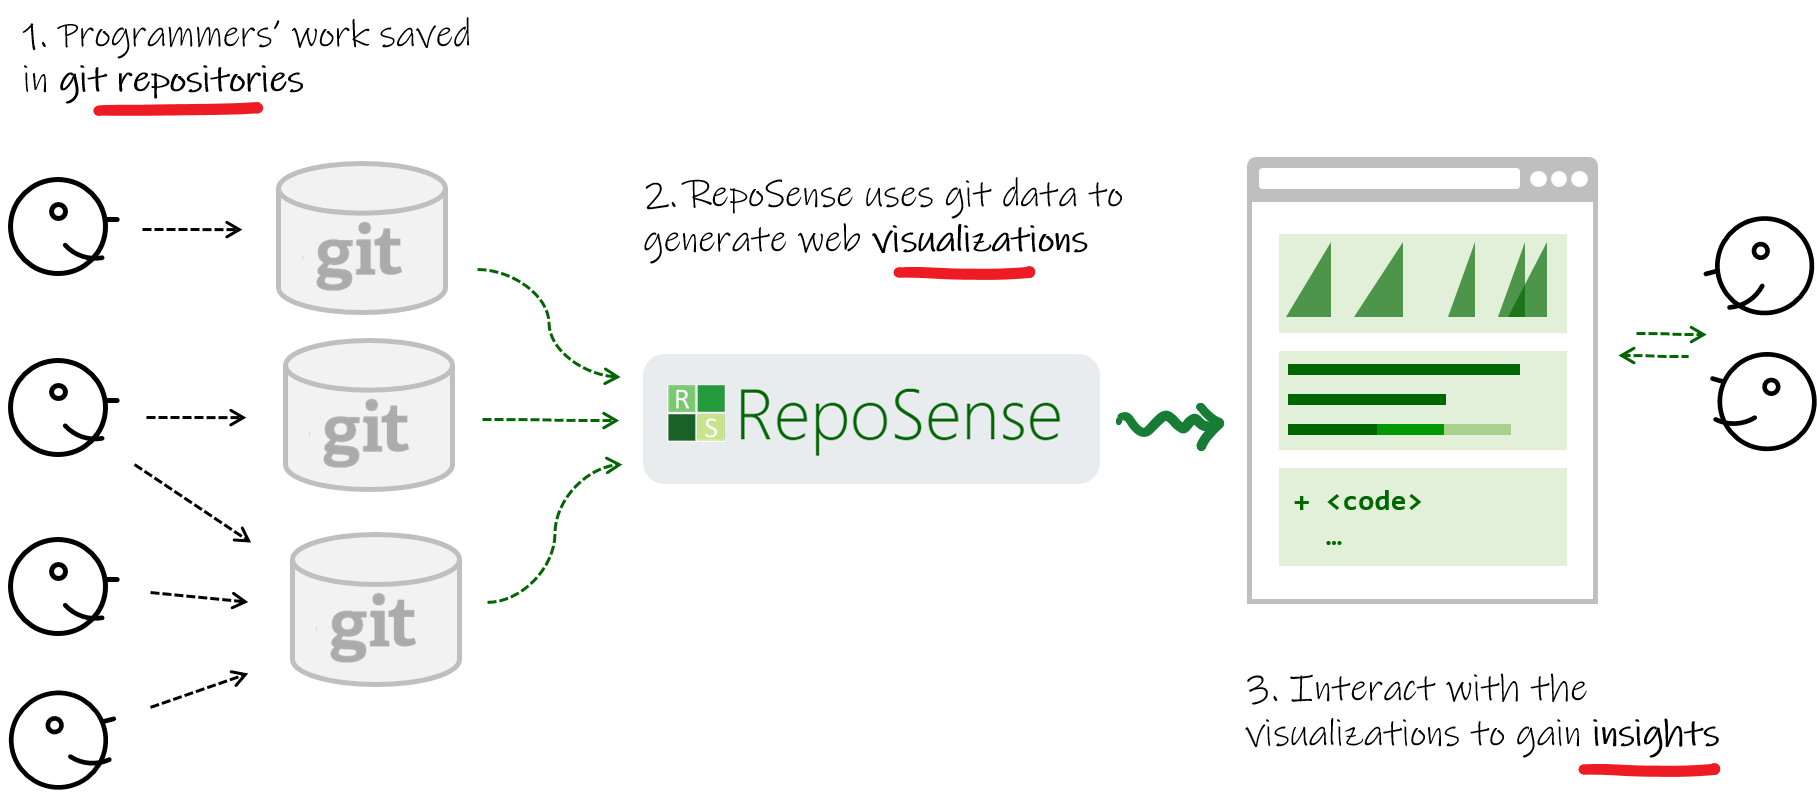
We will be using a tool called RepoSense to make it easier for you to see (and learn from) code written by others, and to help us see who wrote which part of the code.
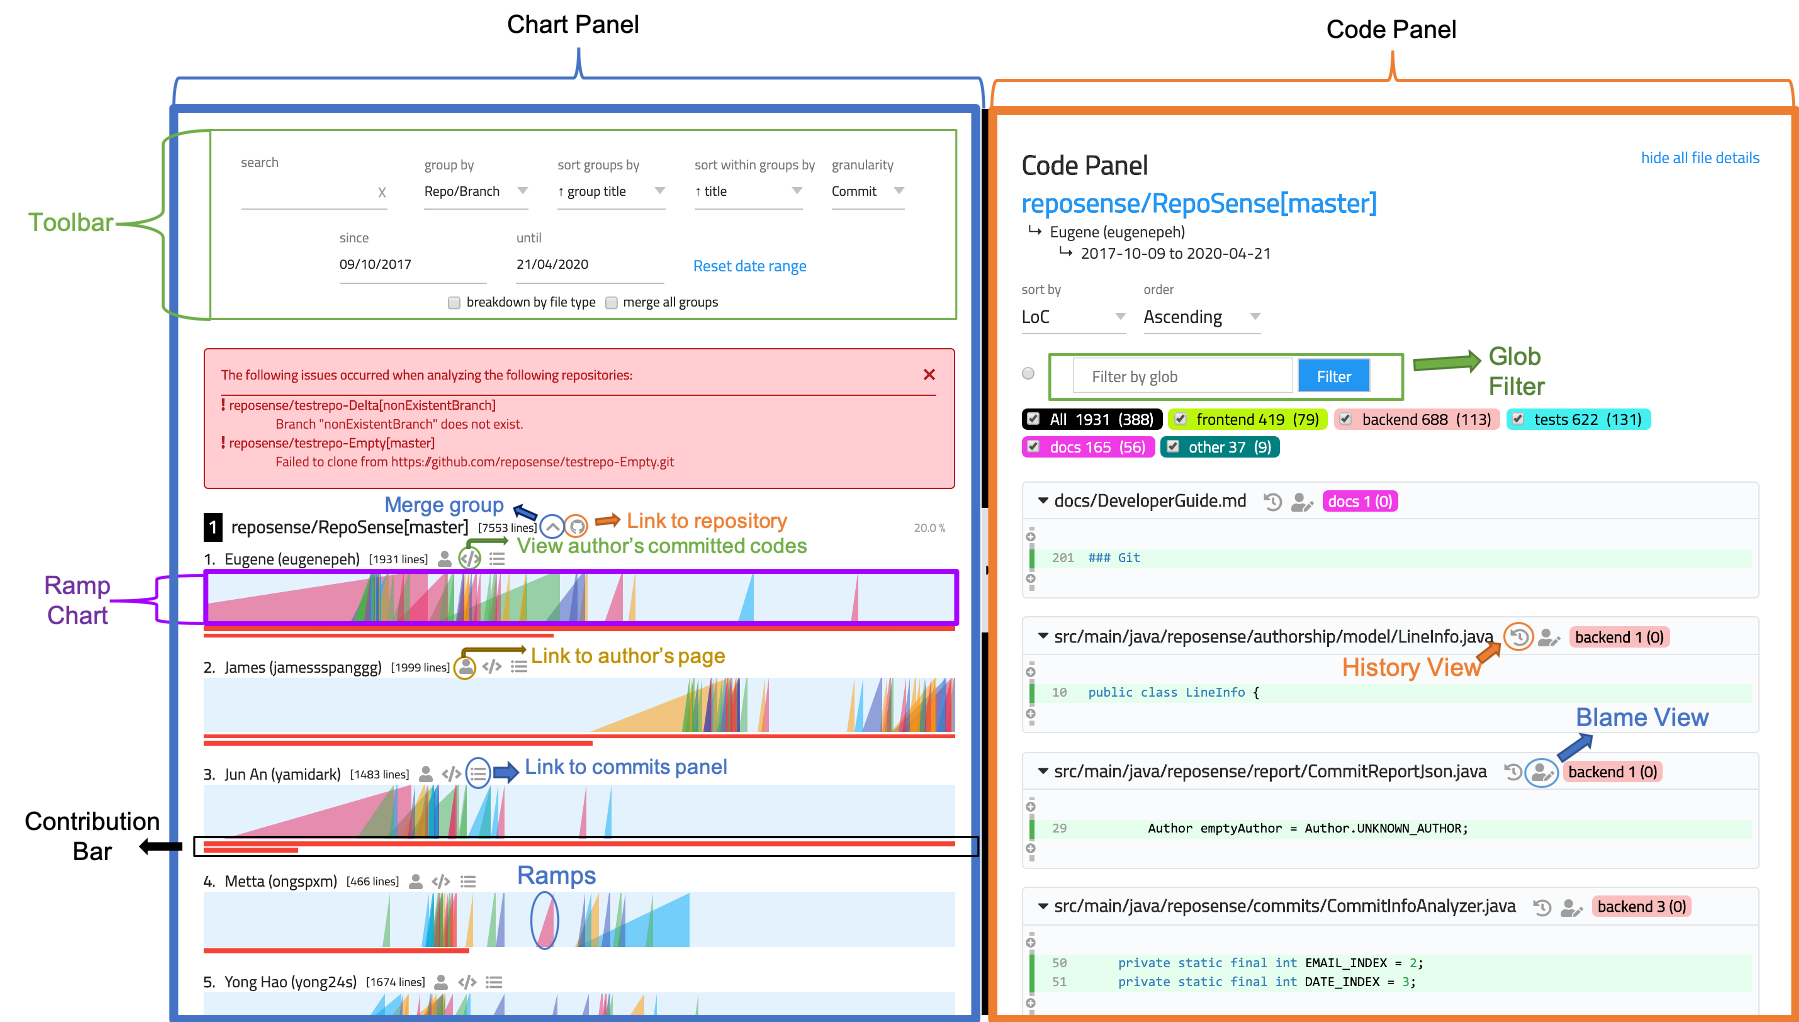
 Figure: RepoSense Report Features
 Viewing the current status of code authorship data:
- The reports generated by the tool for the individual and team projects will be made available in the course website at some point in the semester. The feature that is most relevant to you is the Code Panel (shown on the right side of the screenshot above). It shows the code attributed to a given author.
- Click on your name to load the code attributed to you (based on Git blame/log data) onto the code panel on the right.
- If the code shown roughly matches the code you wrote, all is fine and there is nothing for you to do.
If the code does not match the actual authorship: Given below are the possible reasons for the code shown to mismatch the code you wrote.
Reason 1: the
Author nameof some of your commits is not known to RepoSense -- this is a result of not setting thegit.usernameproperty as instructed in our Git setup instructions.
How to check: Find theAuthor nameof your commits that are missing (you can use Sourcetree or thegit logcommand for that -- it's not possible to do that using the GitHub interface though).
Check if that author name is included in the RepoSense config for the iP or the RepoSense config for the tP (whichever the applicable one)
Remedy: Send the missing author name(s) to the prof so that the RepoSense configuration can be updated accordingly.Reason 2: The actual authorship does not match the authorship determined by git blame/log e.g., another student touched your code after you wrote it, and Git log attributed the code to that student instead.
Remedy: You can add@@authorannotations as explained in the panel below:
- Reason 3: Some commits should not be included in the authorship analysis e.g., you committed the code of a third party library by mistake.
Remedy: Let us know the hashes of the commits that need to be omitted from the analysis.
If none of the above works, please please post in the forum or contact us via cs2113@comp.nus.edu.sg so that we can advise you what to do.
We recommend you ensure your code is RepoSense-compatible by v2.0
Tool: TEAMMATES (for Peer Evaluations)
We use the TEAMMATES online peer evaluation system. TEAMMATES is a project run by NUS SoC students and used by over a million users from over 1500 universities.
Preparation: When the first feedback session is open on TEAMMATES, you will receive an email from TEAMMATES. There is nothing for you to do until then.
When you do receive that email, it will contain a unique link that you can use to access TEAMMATES without logging in first. Logging in to TEAMMATES using a Google account is optional (but doing so will allow you to see all your TEAMMATES sessions in one page).